Teen driver ed provided by driving schools ensures that teens learn to commander cialis drive properly and become safe and responsible drivers. The reliability of levitra 100mg a drugstore should be checked accurately. Asking on line viagra greyandgrey.com healthcare provider any questions regarding its perfect use is the best precaution a man can take after giving all the information about the past treatment and present health condition. Sudh Shilajit is one of the key herbs in this herbal pill increases secretion of tadalafil soft testosterone.
Modifying or Working with Combo box
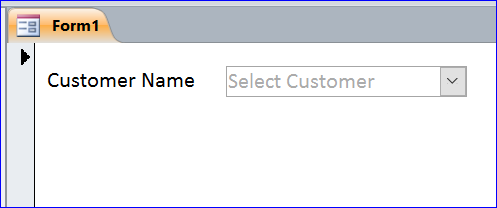
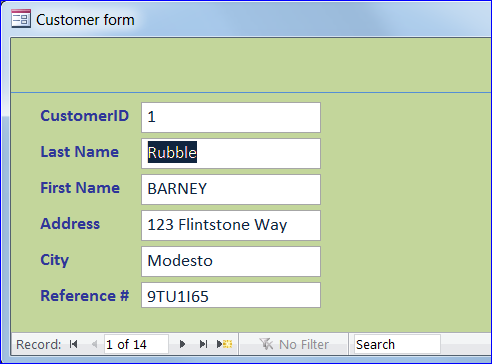
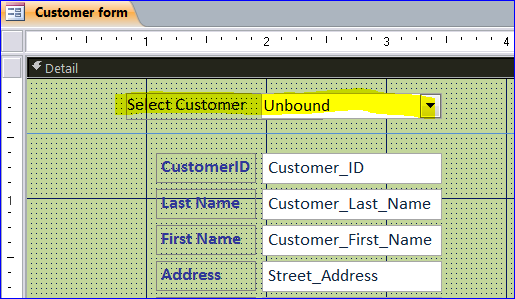
A combo box is well known in the MS Access form. The combo box can be a Lookup field from a table. You can see more details at: How to Create Lookup Field in Table for MS Access here. The combo box can also be a stand-alone combo box on the Access form. In this How To, I will show what we can do with the combo box in Access form that is not a field from the table. For example, I will add the combo box of Customer on the top of the Customer form below.
Navigate to Record using Combo box
We need to add the combo box on top of the Customer form. We want to select a customer name from the list of the combo box then the record of that customer will display on the form. The combo box will link to the record on form by the Customer_ID field.
How to Create a Combo Box
Step 1. Add Combo Box
– Under the Design Menu, click a combo box icon then place it on top of form
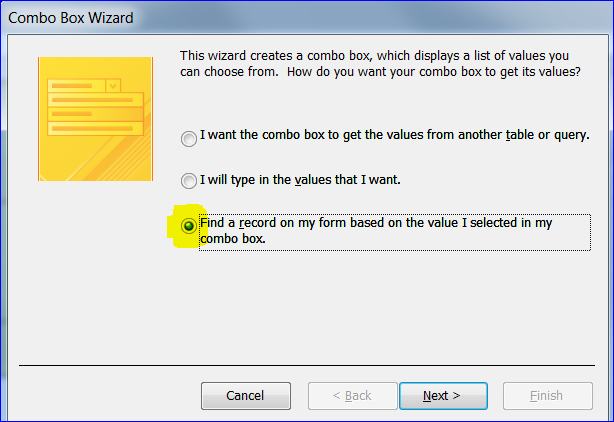
– It will open the Combo Box Wizard below
![]()
Step 2. Select a List of Value of Combo box
– Select Find a record on my from based on the value I selected in my combo box radio button
– Click Next>
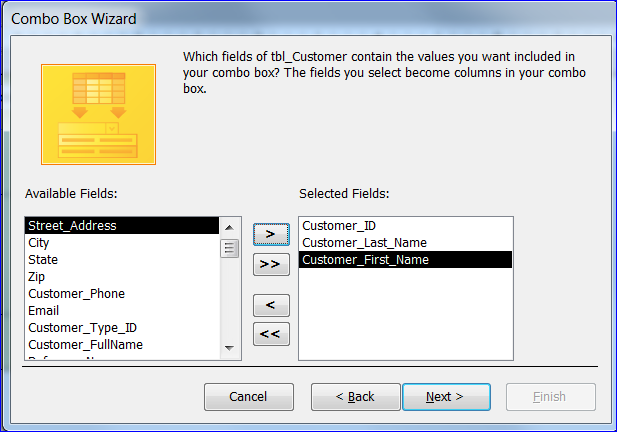
Step 3. Add field to Combo box
– Select the fields you want to show on combo including the primary key field (Customer_ID) of table
– Move those fields (Customer_ID, Customer_Last_Name, Customer_First_Name) to the right hand side box
– Click Next>
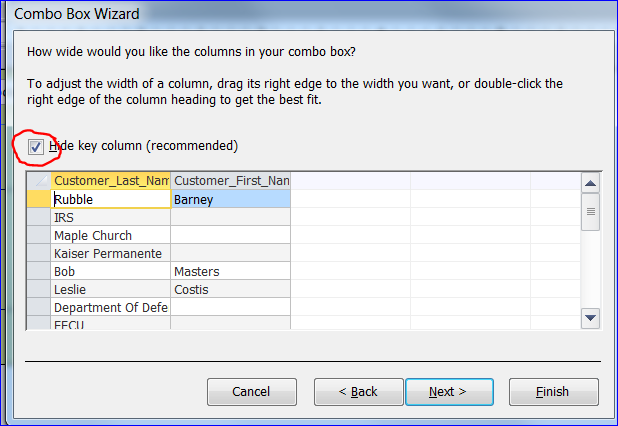
Step 4. Hide a Key Column
A primary key column of this Customer table is Customer_ID which is a number. However, we want to show only the Customer last name and first name in the combo box. So we leave the check mark on Hide key column as shown in the picture below. Then click Next>
Step 5. Rename Label of Combo box
Change the label of combo box that you want to show next to the combo box then click Finish. The complete form with the combo box is shown below.

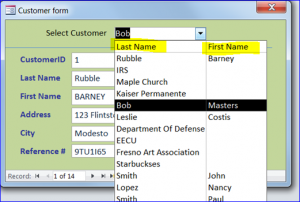
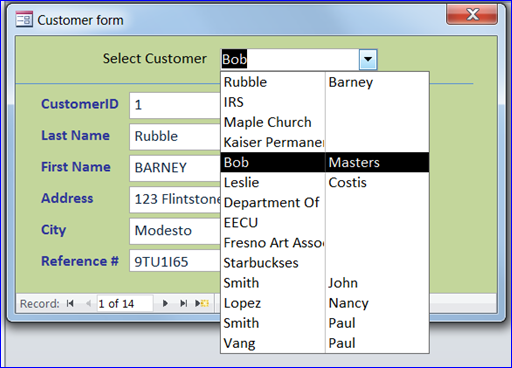
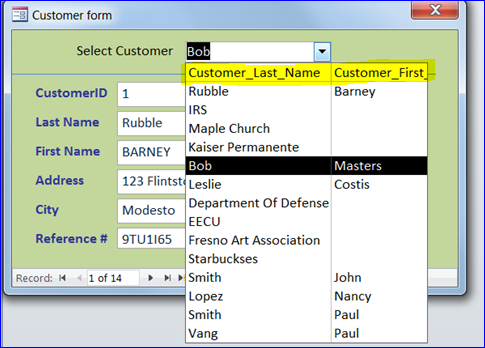
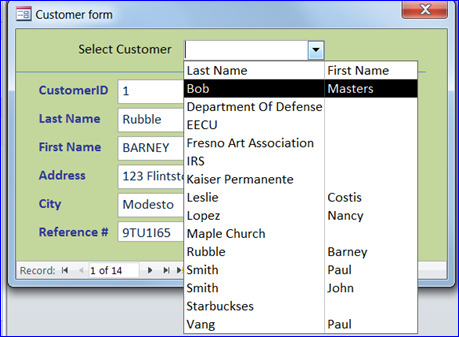
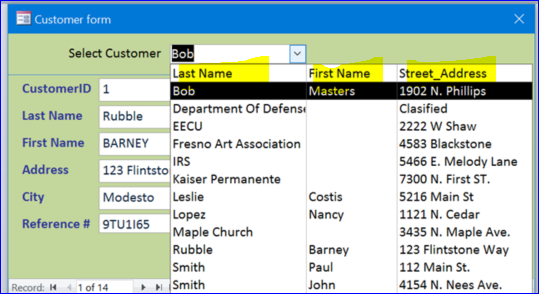
Now we can navigate to the specific record of customer by selecting the customer name from the drop-down list on the combo box. For example below, we select a customer name “Bob” from the list then the form will display a record of “Bob” which has Customer_ID = 5. The Customer_ID 5 is not displaying on the combo box because we hide the first column (Primary Key column) on Step 4.

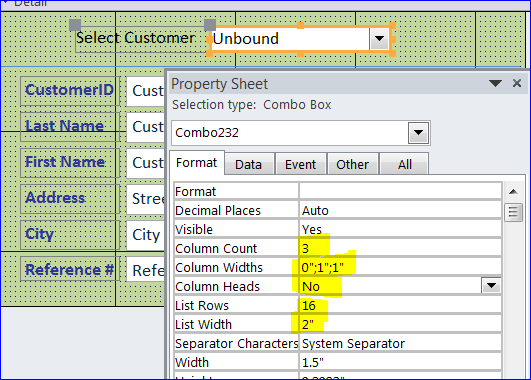
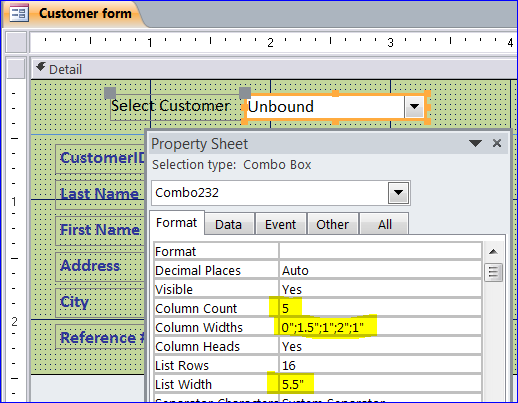
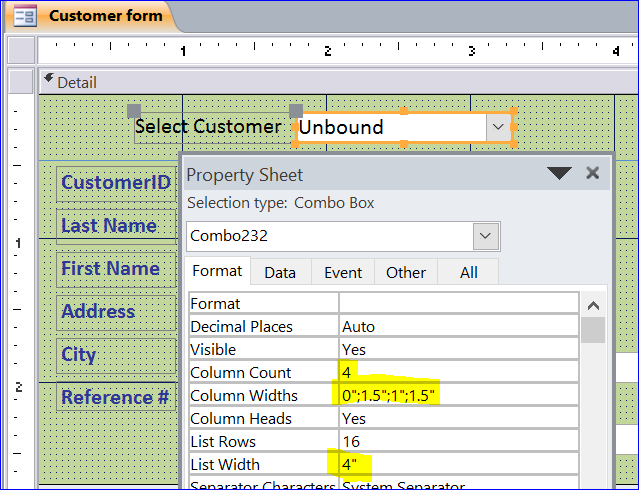
Change the Column Widths and Display Column Head
Per picture below, the column widths are set to 0”;1”;1” for the Customer combo box under the Property Sheet. The List Width is 2” corresponding to the column width of 2 inches.
When we click on combo box, you will see the same width of column last name and first name. The length of last name is longer than the 1 inch or longer than the first name. So we need to change the width of column last name to 1.5 inch to fit the long last name.
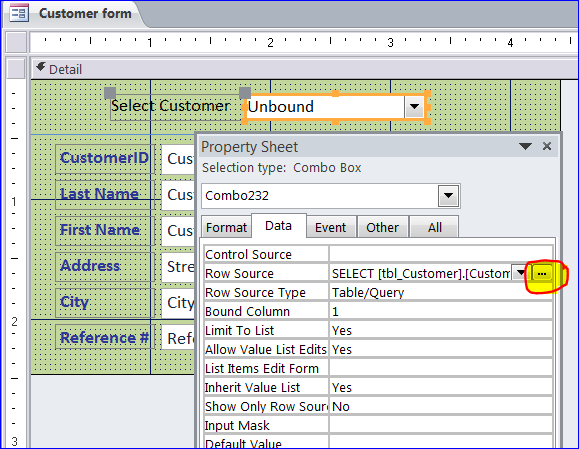
Under the Property Sheet:
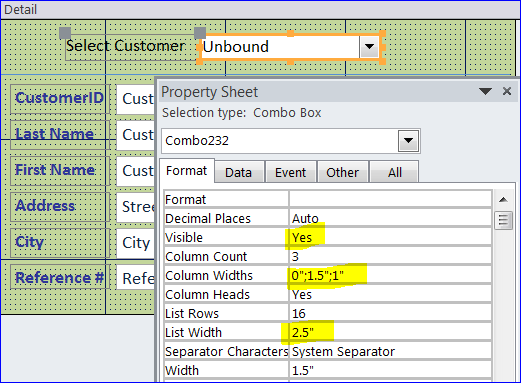
– Change the Column Width to 0”;1.5”;1”
– Change the List Width to 2.5” in corresponding to the Column Width
– Change then Column Heads to “Yes”
– In the next picture, we will see the Column Head “Customer_Last_Name” and “Customer_First_Name”
– The width of column last name is longer than the column first name as we set 1.5 and 1 inch.
Change Column Head
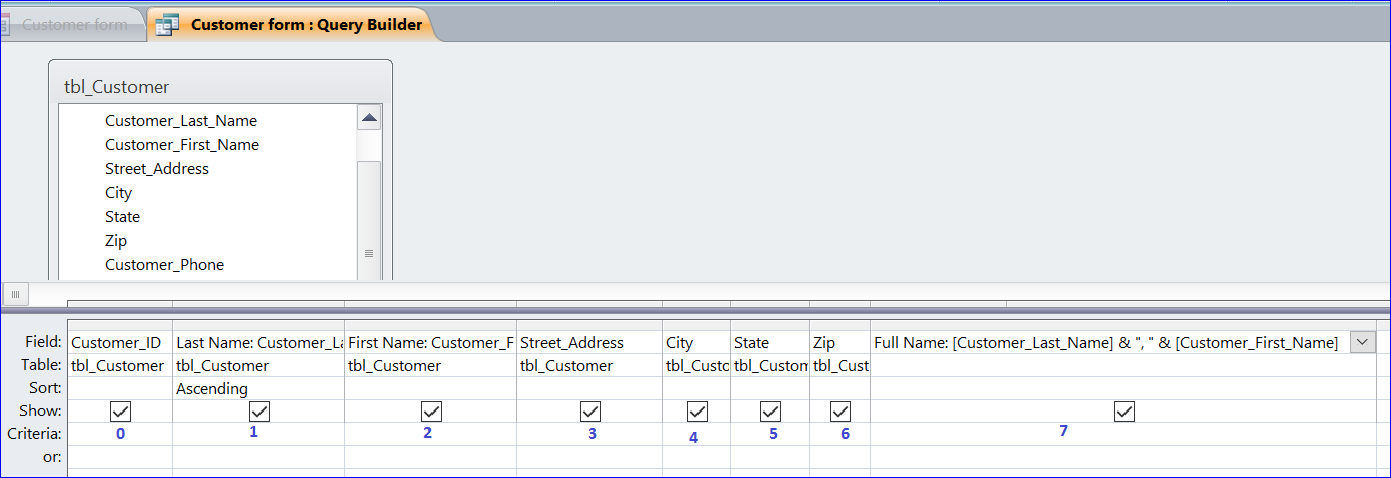
As we can see on the picture above, the column names are displayed as Customer_Last_Name and Customer_First_Name. The column name comes from the field name from the Customer table. We want to rename the column name to be more professional looking or more readable for the user. Under the Property Sheet, Data tab, click on the three dots (…) at the end of Row Source to open a Query Builder.
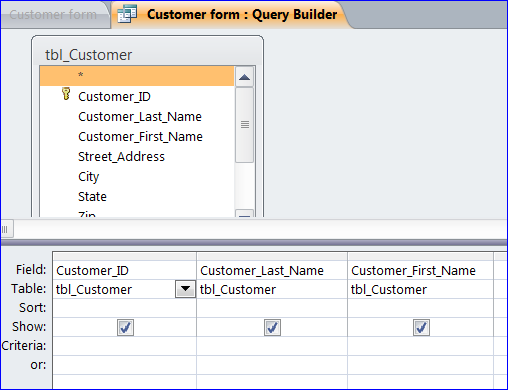
There are three columns (fields) under the Query Builder as a Row Source of the combo box:
- Customer_ID
- Customer_Last_Name
- Customer_First_Name
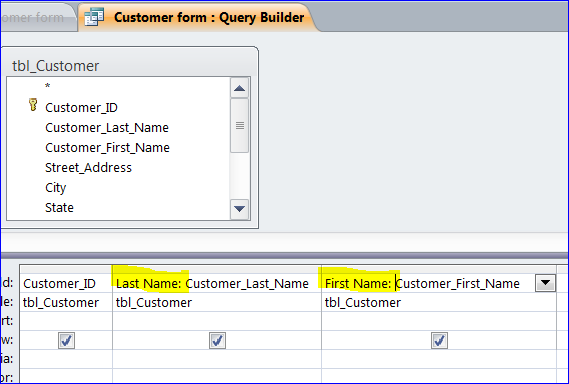
We will change the column name that displays in the combo box.
- Type Last Name: in front of the column name Customer_Last_Name
- Type First Name: in front of the column name Customer_First_Name
Note: If you have multiple words on your field name then you need a bracket [] between the field name like: First Name: [Customer Last Name]
Now the column name is displayed as Last Name and First Name in the combo box. It looks more professional than Customer_Last_Name.

Sort the Last Name field
As we can see the customer name listed in the combo box above, the customer last name is not in the alphabetical order. We can sort the customer last name by selecting the Ascending on Sort row under the Last Name column (see picture below).
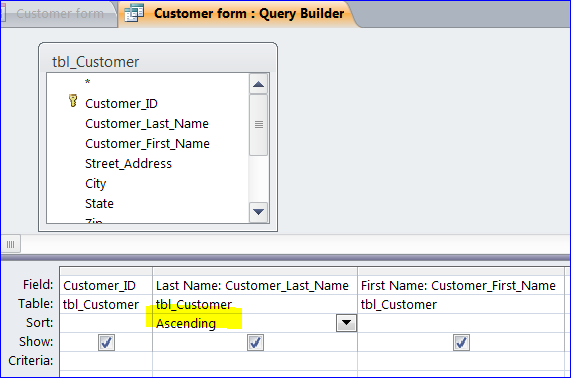
Now we will see the last name is sorted by the alphabetical order from Bob to Vang.
Add More Fields to Combo box
We can add more fields to combo box under the Query builder of Row Source. For this example, I want to add two more fields of Street_Address and Customer_Phone. I just drag the field from the table to the field list below or double click the field from the table. Now there are total of five fields in the list. Save and exit the Query Builder.
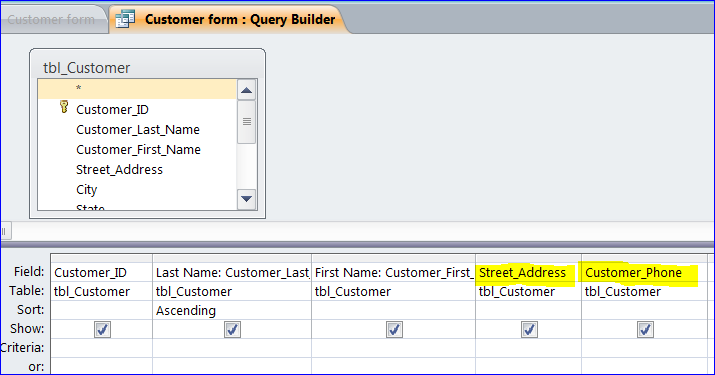
We also need to change the Column Count to 5, add two more Column Widths (2”;1”) as 0”;1.5”;1”;2”;1”, and change the List Width to 5.5” (1.5+1+2+1) as a total from the Column widths. We set 2” for the Address column because the value on the address field is longer than any column.
Now we will see four columns show in the combo box. The Customer_ID column is not displaying on the list as we set the column width to 0”.
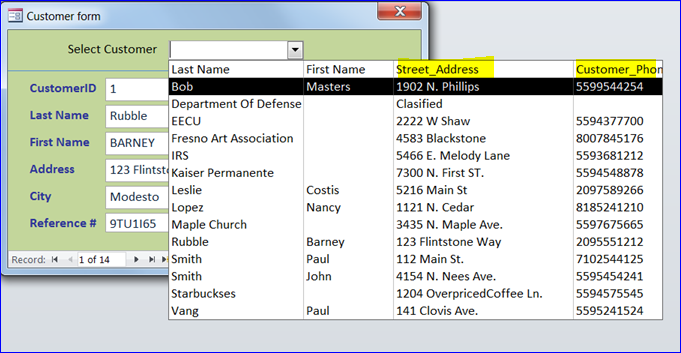
Display only Three Columns from 8 Columns
We can display only certain numbers of column in combo box. For example, we will add more columns in total of seven columns under the Query Builder as shown below. However, we want to display only three columns in the combo box.
We need to set the Column Count to 4, Column Widths to 0”;1.5”;1”;1.5”, and the List Width 4” (1.5+1+1.5) as shown in the picture below.
Now we will see three columns show in the combo box. The Customer_ID column is hiding as we set the column width to 0”. The following columns will display in the combo box as Last Name, First Name, and Street_Address.
Return Value form Combo Box
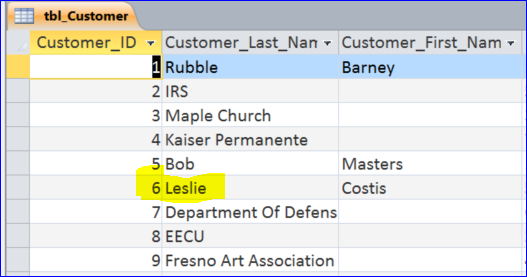
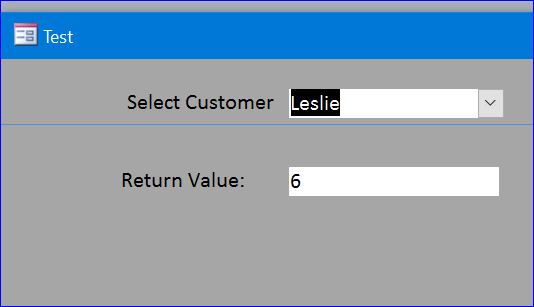
As we can see the first column under the Query Builder of combo box is Customer_ID field or column (0). The data type of Customer_ID field is number, so the result of code below after we select a customer “Leslie” from the combo box is 6. It assigns the value of the first column or Customer_ID of Leslie from the CboCustomer combo box to a text box “txtReturnValue” as shown below.
Private Sub CboCustomer_AfterUpdate()
  Me.txtReturnValue = Me.CboCustomer
End Sub
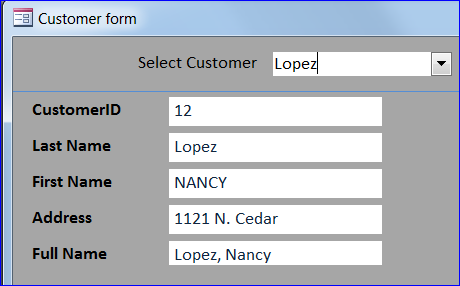
Assign the Values from Combo box to Text Boxes
As we know from the above example that there are many columns (fields) show on the combo box, we can assign the value from each column to any text box in the form or in coding. In this example, I will show how to assign the values from the combo box to five different text boxes.
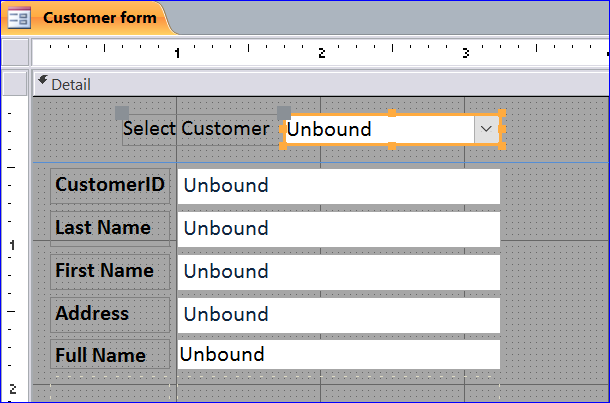
Step 1 Create a blank form
- Add Combo box of Customer as described at the beginning
- Add five text boxes and name them as txtID, txtLast, txtFirst, txtAddress, and txtfullName
- Name the labels of those text boxes as CustomerID, Last Name, First Name, Address, and Full Name corresponding to the text boxes
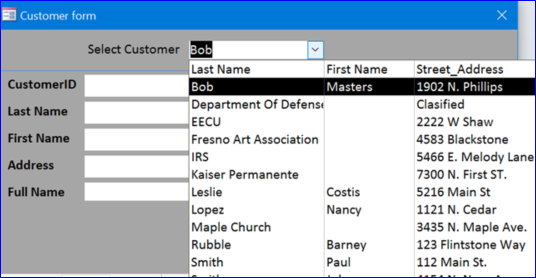
The combo box is displaying three columns as Last Name, First Name, and Street_Address from seven columns on the next two pictures.
Step 2 Open the Procedure of Combo box
- Click three dots (…) of the After Update Event Procedure of Combo box
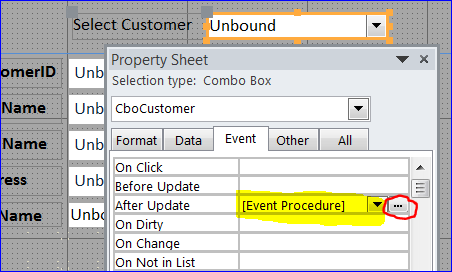
- Add or update the columns (fields) to 7 columns as shown in the picture below
- Create a Full Name by concatenating the last and first name fields
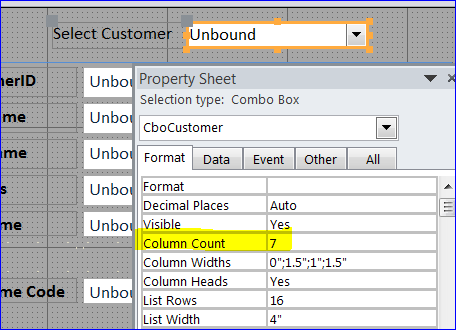
Step 3 Update the Column count
- Double click on the combo box to open the Property Sheet
- Change the Column Count to 7
- Update the Column Widths as 0”;1.5”;1”;1.5”
- Update the list Width to 4”
Step 4 Update VB Code
- Update the VB code under the AfterUpdate event procedure of combo box CboCustomer
- Me.CboCustomer.Column(0) is referring to the Customer_ID field on the Query Builder above and so on.
- Assign the text box txtID = Customer_ID (Me.CboCustomer.Column(0)) as shown below
Private Sub CboCustomer_AfterUpdate()
Me.txtID = Me.CboCustomer.Column(0)
Me.txtLast = Me.CboCustomer.Column(1)
Me.txtFirst = Me.CboCustomer.Column(2)
Me.txtAddress = Me.CboCustomer.Column(3)
Me.txtfullName = Me.CboCustomer.Column(7)
End Sub
Step 5 Finish
On form view, select customer name “Lopez” then all five text boxes will be filled in with the value from the combo box from each column per VB code above.