Download Sample Access File: Hotel/Room Rental Database
This is an example file of Hotel Rental Database. It is the basic of rental database, but you can add more fields or tables as you want. The Admin can add new rooms, new employees, new customers, and other information. The regular user can book a room, add customer, and search for booking.
Highlight functions or features in this sample file include:
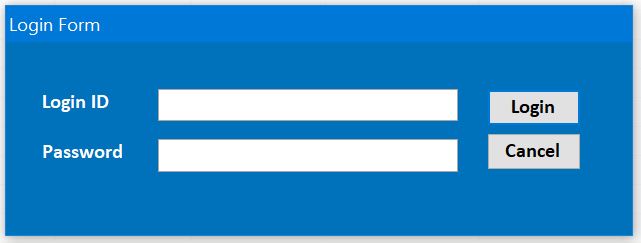
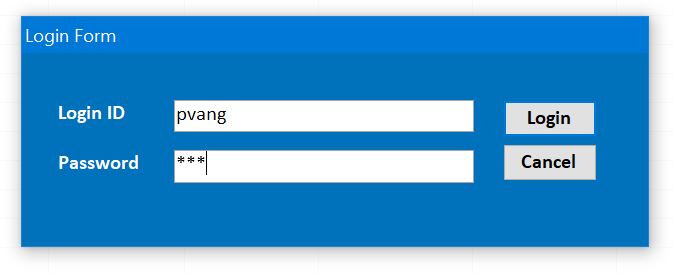
#1 Login Form
This form is first loaded when the program is opened. It asks user to enter a UserName and Password. If both UserName and Password are correct then it will open a MainMenu Form.
You can set it to open any form as you want on this Login Form.
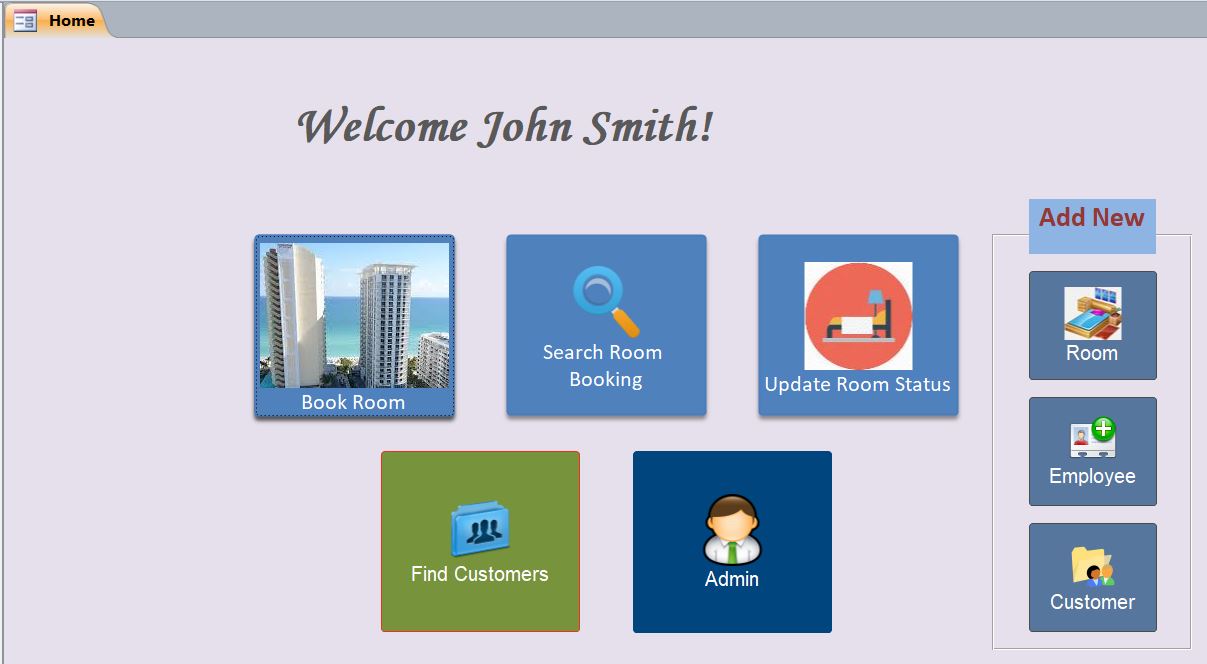
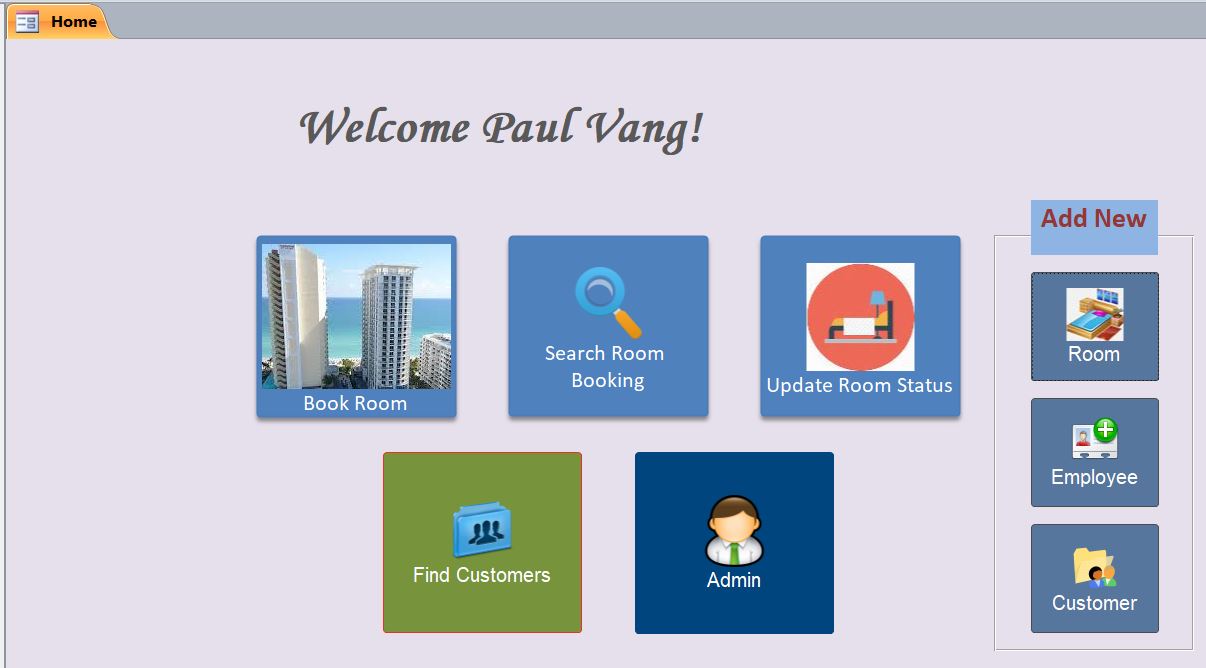
#2 Main Menu Form
The Main Menu Form provides several buttons to open different forms as listed below. The details of each form will be explained below.
- Book a Room button
- Search Room Booking button
- Update Room Status
- Find Customers button
- Admin button (for Admin only)
- Add New Room button (for Admin only)
- Add New Employee button (for Admin only)
- Add New Customer button
#3 Book a Room Form
After clicking on the Book Room icon, the Book Room form will open and be ready to start booking a room.
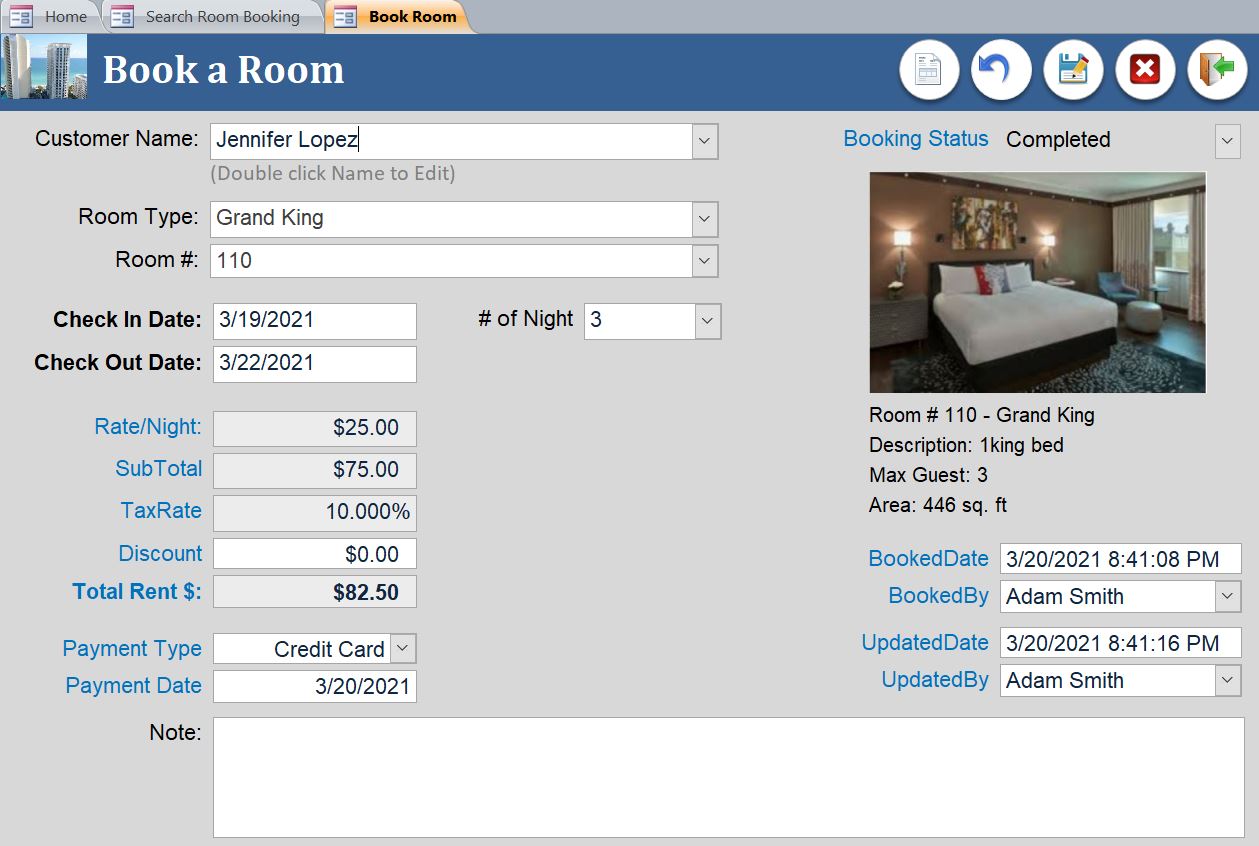
How it Works
- Start with selecting the customer name from a drop down list.
- Select Room Type, Room Number, Check-In Date, # of Night to stay or Check-Out date etc.
- If you can select Room Type, only the Room number with that room type will display on the dropdown list.
- You can directly select the room number without select the room type.
- After selecting the room number, the information for this room number including the photo will display on the right side of this form.
- After selecting the # of Night, the Check Out date will be auto filled in.
- Or if you select the Check Out date, the # of Night will be auto updated as well from the calculation from the Check-In date.
- The Undo icon
 is provided to cancel the booking or undo any changes.
 - After select customer then click Save icon
 , the information will auto update the BookedBy, BookedDate, UpdatedBy, and UpdatedDate fields.
 - Delete icon
 is used to delete the booking record if created in error. Only the user with an Admin Type has an access to delete the record.
 - The Note section is provided for the user to put any message regarding this booking including the reason of cancel.
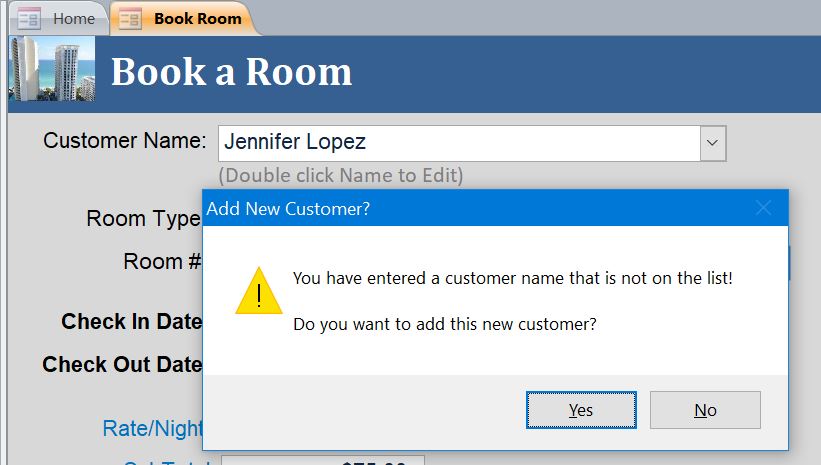
- If the customer name is not on the list then the user can able to add a new customer after click Yes on a pop-up message.
- After selecting the Room Number, the Booking Status will be updated to “Reserved” and the Room Status on Room table will change to “Booked” (not available to book)
- After selecting the Payment Type, the Booking Status will change from “Reserved” to “Completed”
- After updating the status to Complete or updating the Ending Mileage, the Available status on the Vehicle table will be changed to “Yes”
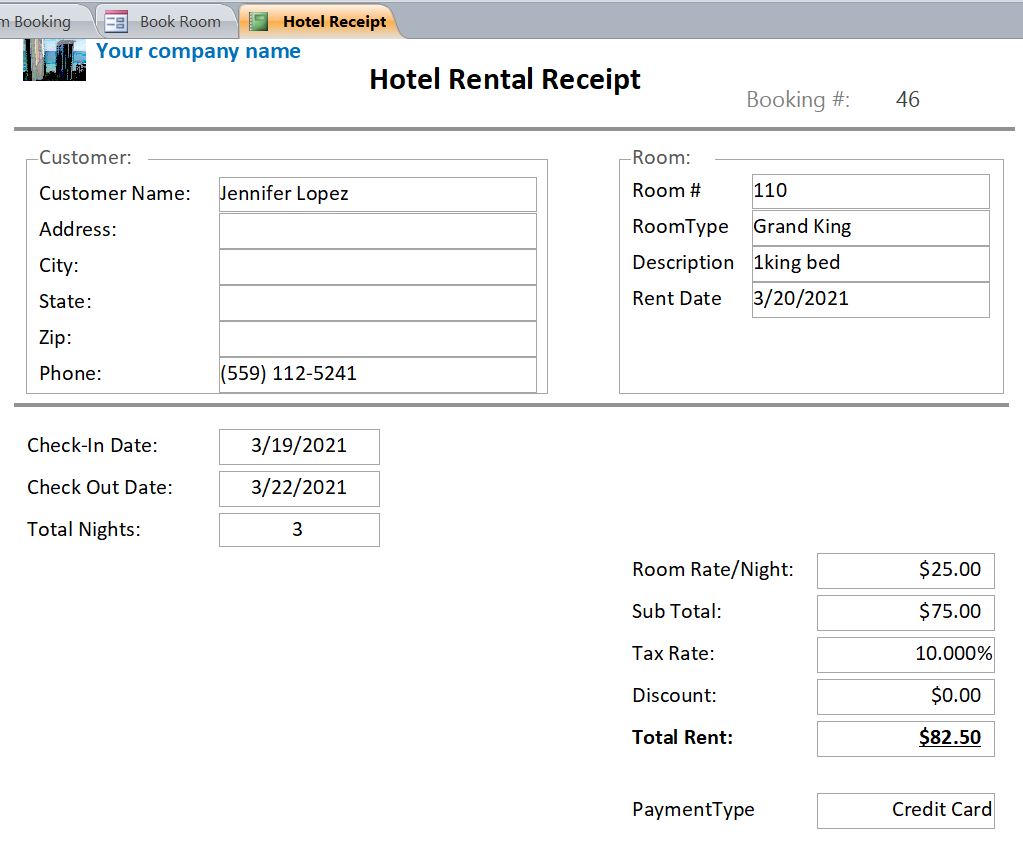
- The Receipt icon
 opens the report to view or print the receipt. The example of receipt is displayed below.
Example of Receipt
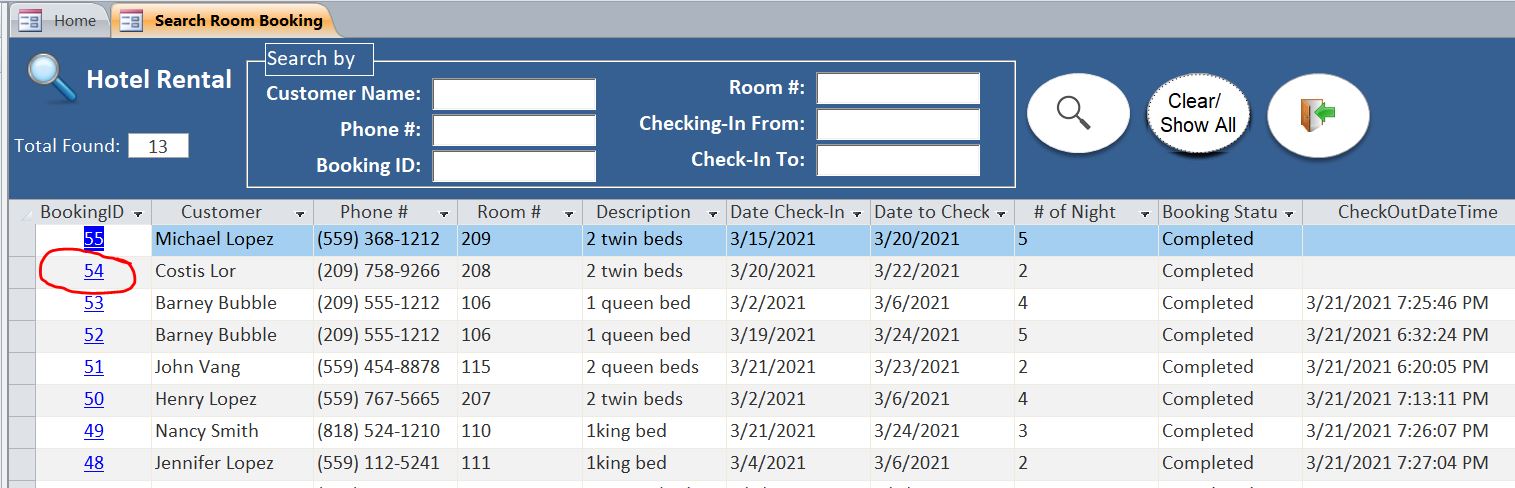
#4 Search Room Booking Form
This form is available to all users on the Main Menu Form. The user will use this form to search for the room rental record. The function on this form is listed below.
- Search a rental record with the criteria keyword for customer name, phone#, BookingID, Room#, or Check-In date; From and To. The criteria for searching can be a single field or a combination of these fields.
- Clear the criteria/results and show all room rental records
- Provide a link to open the Book Room Details Form on the BookingID field. This can be used to find the room rental record and update the rental information when the customers checks out the room.
- Close form button
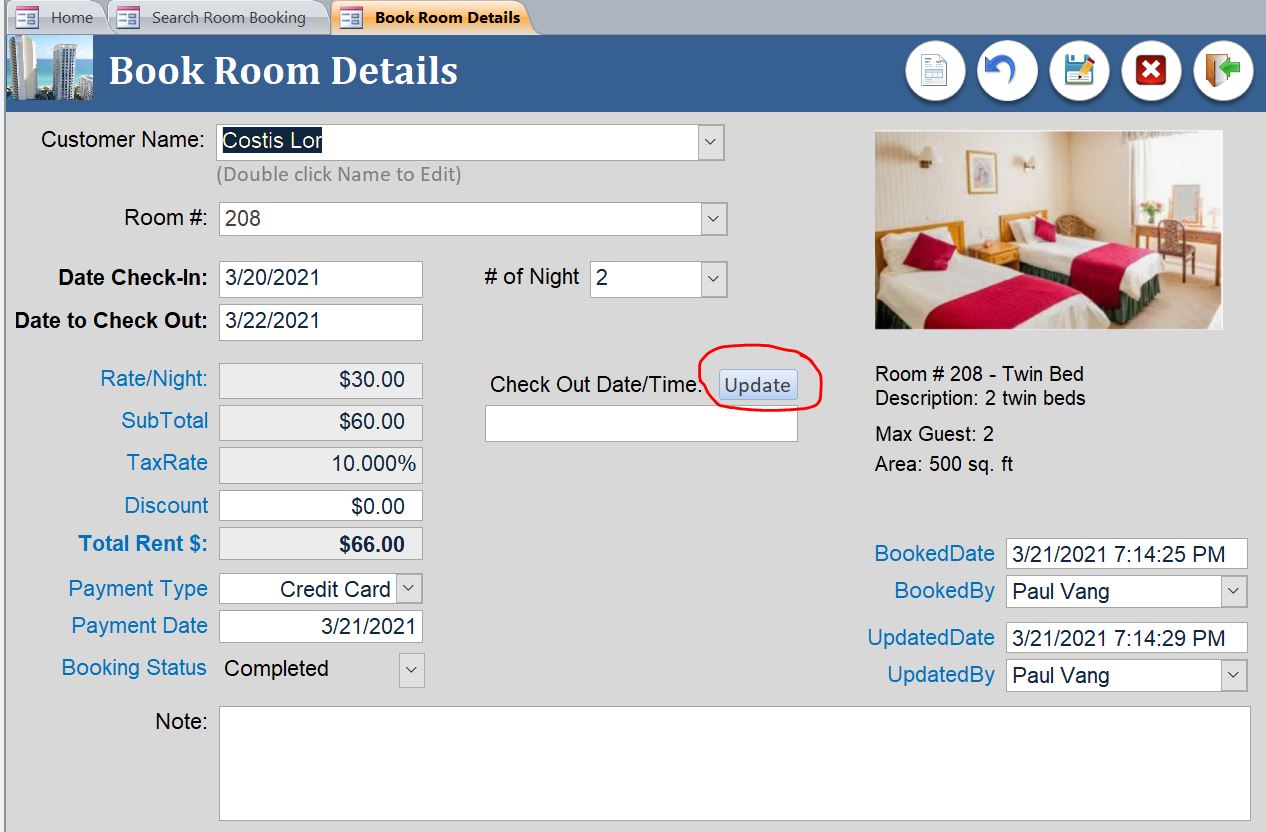
Book Room Details form
This form is similar to the Book Room form. It doesn’t have the Room Type, but have additional Check Out Date/Time field.
- The Check Out Date/Time field is for updating the date/time after the customer check out.
- Click on the Update button to update the date and time without typing the date in the field box.
- After updating the Check Out Date/Time, the Room Status on Room table will change from “Booked” to “Cleaning” (Still not available to book until finish cleaning).
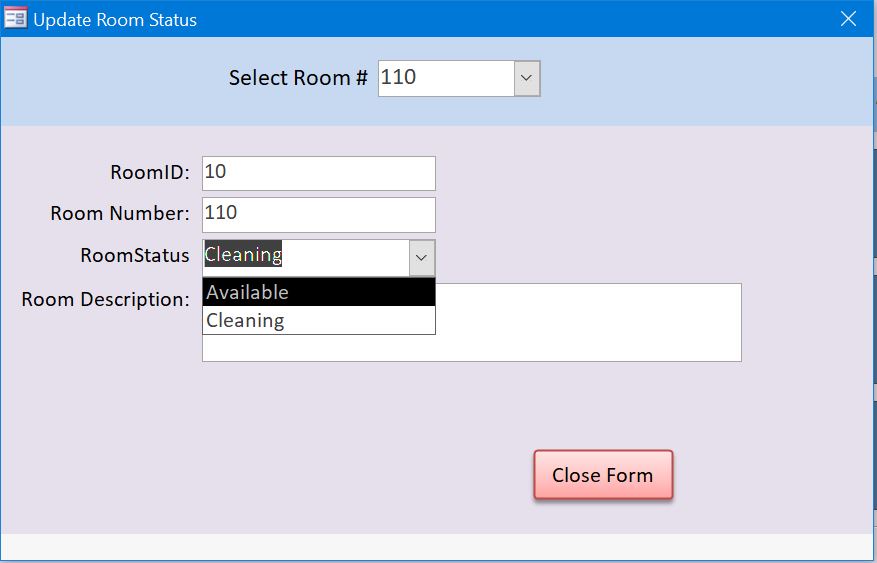
#5 Update Room Status
This form is used to update the room status after it is cleaned. The room must be cleaned before it is available for customer to book again.
- Select the room number from the dropdown list
- Only the room number that was checked out already and in the process of cleaning will display on the dropdown list.
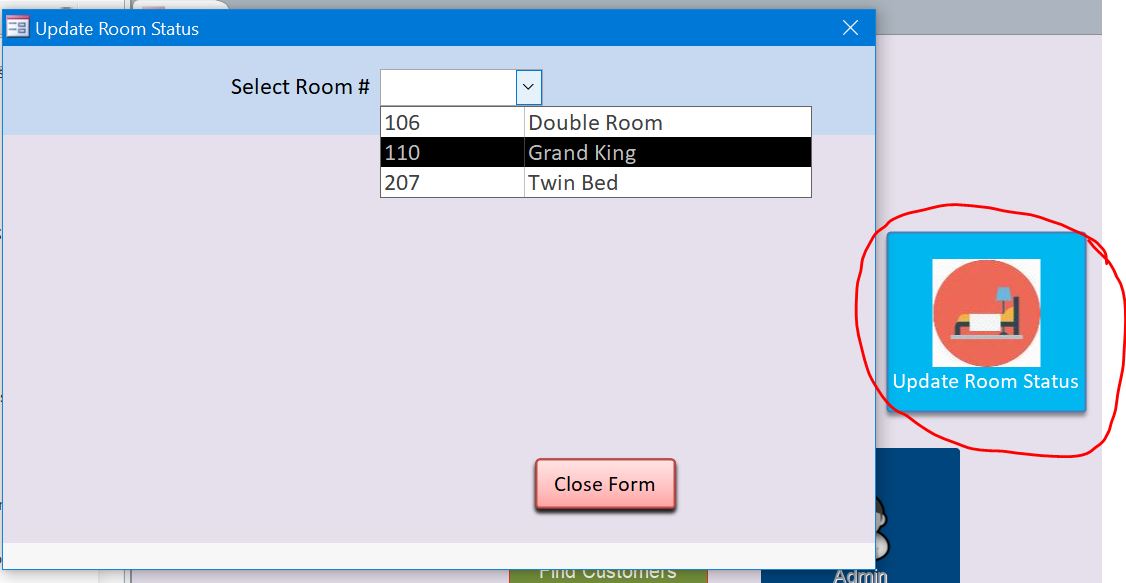
- Update the Room Status from “Cleaning” to “Available”
- Click Close Form button
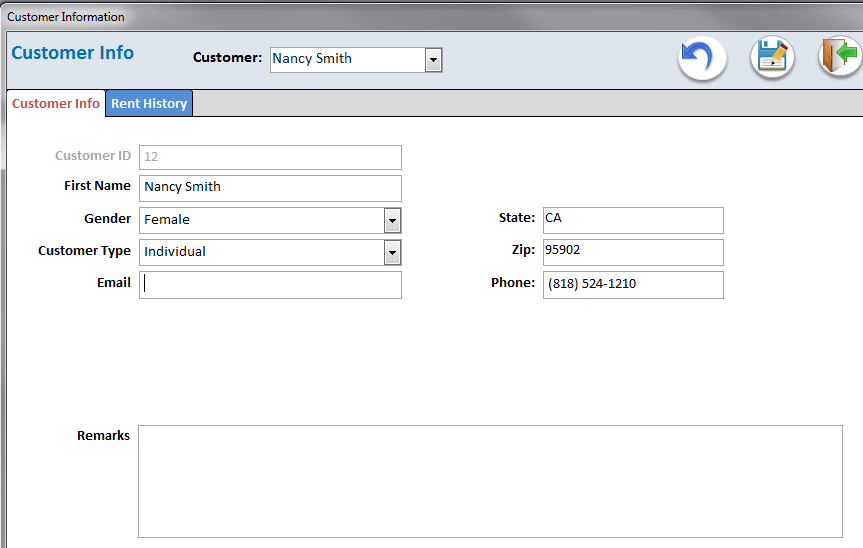
#6 Find Customers Form
This form is consisted of two parts; customer information and the rent history for this customer. The user can select the customer name from the drop-down combo box to view/edit the information for that customer.
#7 Admin Menu Form
This Admin Form provides many tabs for different information to add new data or update the existing data such as add new user, new room, new room type, tax rate etc. The user with the Admin level only will have an access to this form on the Main form.

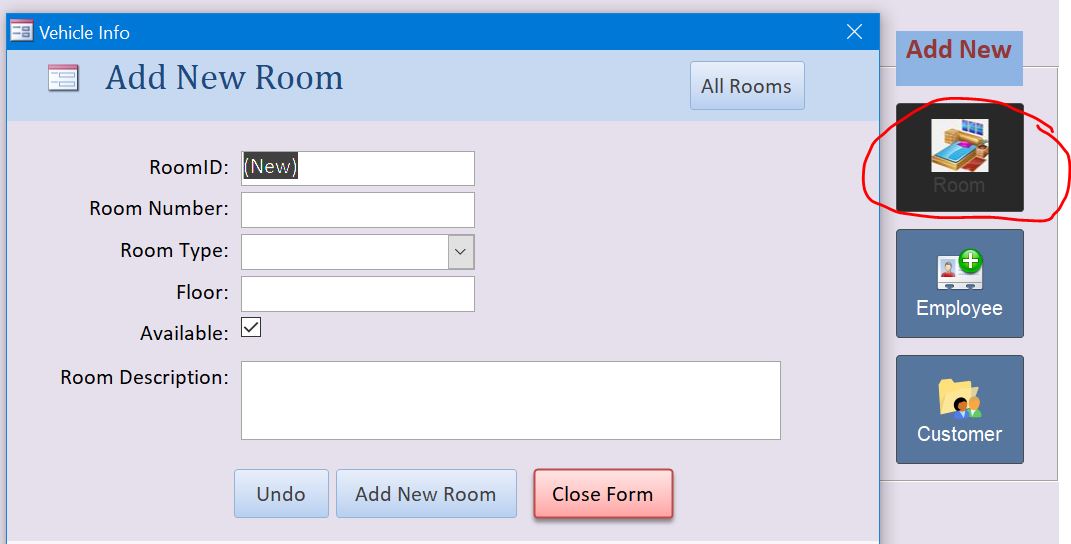
#8 Add New Room Form
The user with the Admin level only will have the access to this form on the Main form to add a new room.
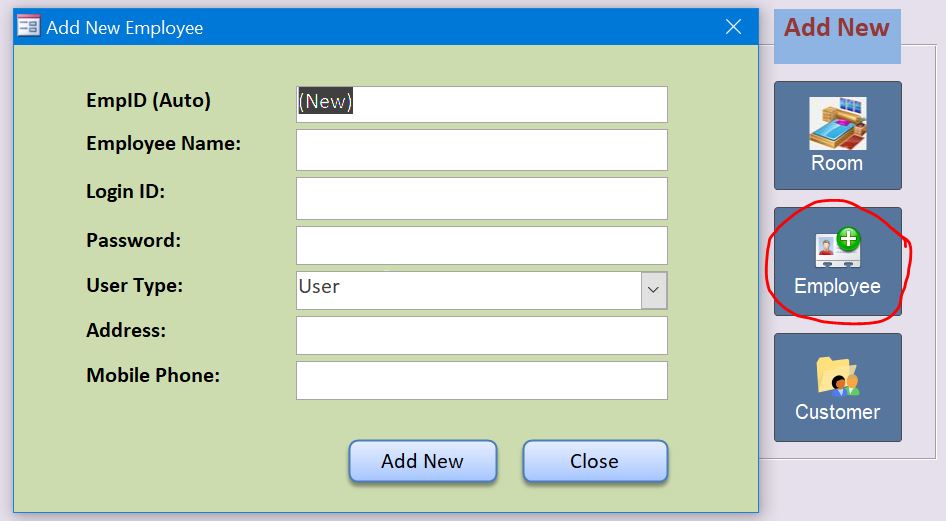
#9 Add New Employee Form
The employee with the Admin level only will have the access to this form on the Main form to add a new employee.
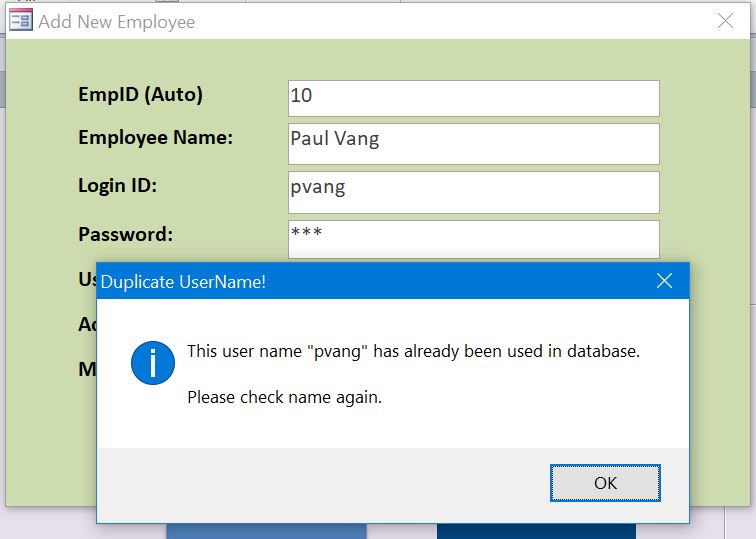
This form includes the function to prevent a duplicate entry of the Login ID. For example, the login ID “pvang” is entered for John Vang. The pop-up message will indicate the duplicated information. After click OK button it will re-direct to the Login ID field to assign a different login ID.
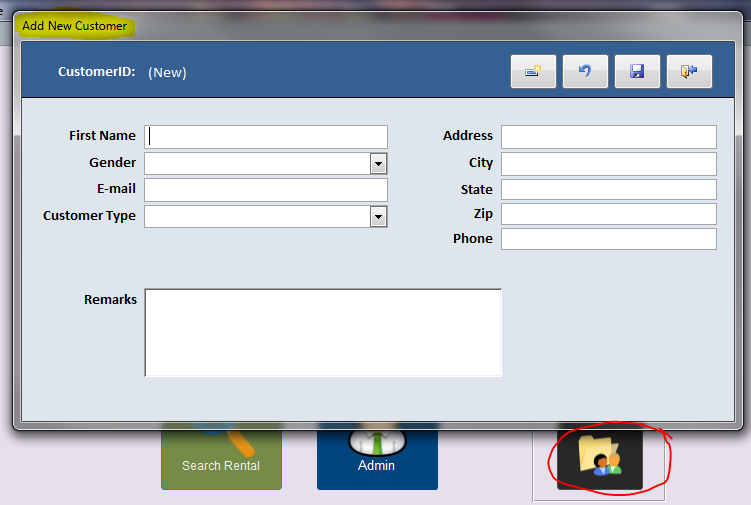
#10 Add New Customer Form
This form can be accessed by anyone from the Main Menu form. There is no restriction for employee to add a new customer. If a new customer comes in office and wants to rent a room, the employee can start with this form to add information for new customer.
This form also includes the function to prevent the duplicate entry of the customer name. For example, John Smith is entered for the customer name. The pop-up message will indicate the duplicated customer name, John Smith.
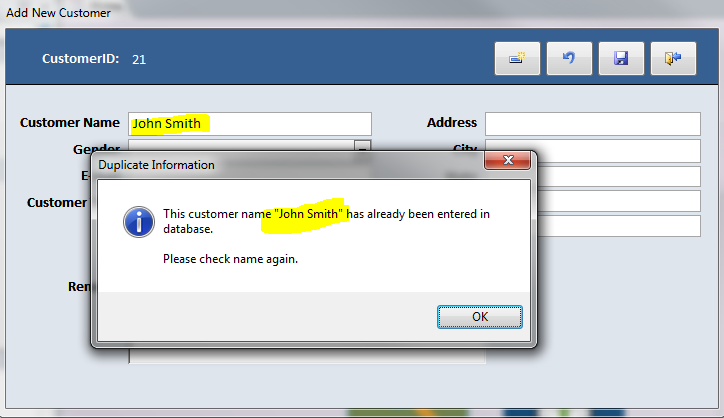
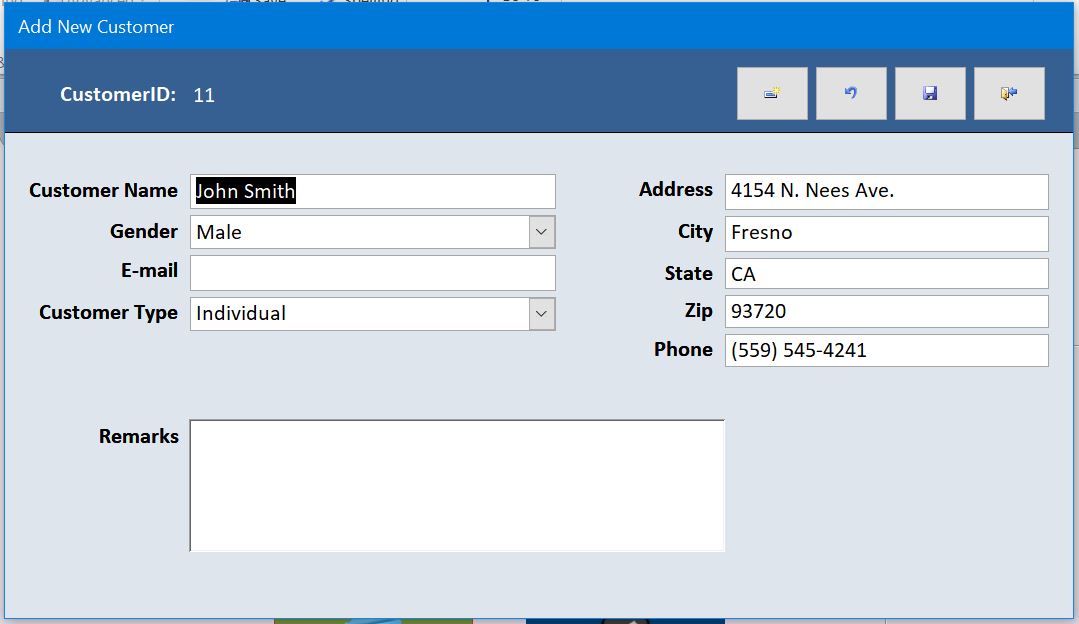
- After click OK button it will re-direct to the existing record of this customer as shown below.
Employee with User Type
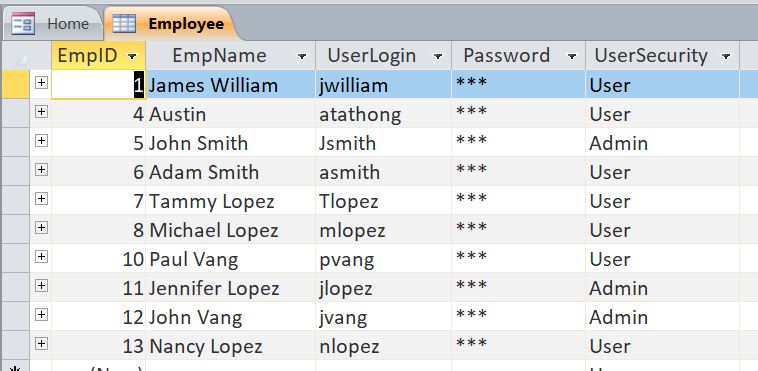
This Hotel Rental database also provides a Login Form for the user/employee login. There are two different types of employee login/security level; Admin and User. Per Employee table below, the UserLogin, Password, and UserSecurity Level are assigned to each user. I set password to 123 for all users on this sample file.
Regular User Login
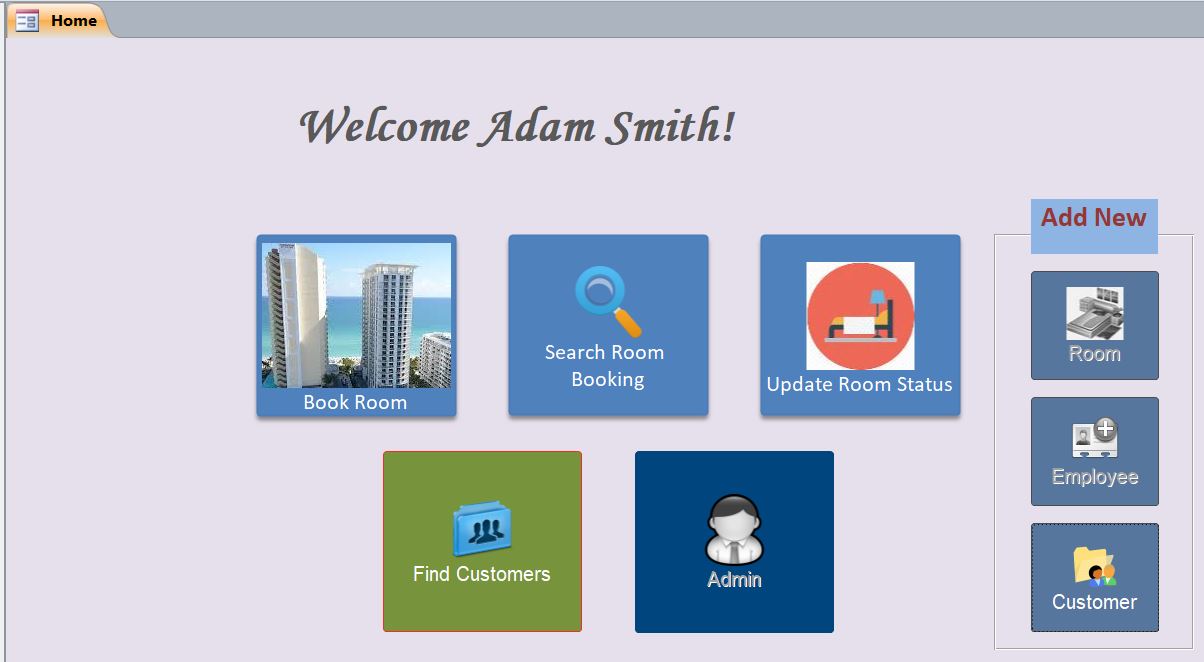
Per example below, a user “Adam Smith” logged in with a username “asmith.” Adam Smith has a user security level as “User.” After Adam Smith logged in, the Add New Vehicle, Add New User, and Admin button on the Main Menu form will be disabled and displayed as black and white color as shown in the picture below.
Admin Login
Per example below, a user “Paul Vang” logged in with a username “pvang.” Paul Vang has a user security level as “Admin.” After Paul Vang logged in, all buttons on the Main Menu form will be enabled and displayed with color picture as shown below.
Download file contains:
11 tables, 2 queries, 22 Forms, 1 Reports, and 2 Modules